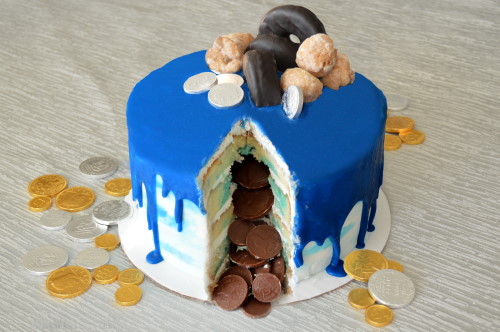
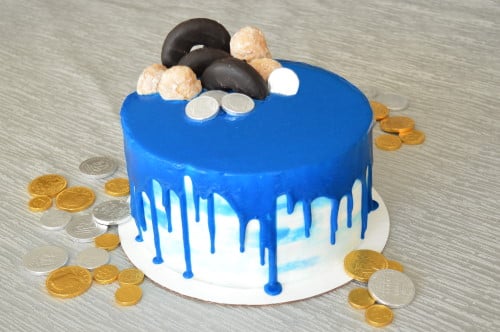
As a part time baker with a full time job and two little kids, I’m always looking for ways to wow a crowd with minimal effort. When Chanukah comes around, I try to find something different from the usual jelly donuts and fried foods. Enter, the Chanukah piñata drip cake!
I’ve been obsessed with drip cakes lately because they’re impressive yet super easy. If you’re new to the drip cake trend, it is what it sounds like: a cake with ganache (white, milk, or dark chocolate mixed with heavy cream or Parve whipping cream) dripping from the top down the sides, creating a cool, messy/chic effect all around.
Another great thing about the drip cake is that it’s beautiful the way it is, but it’s also easy to embellish it and get creative. You can make it simple with a monochromatic look, using the same color buttercream and drip or go crazy with buttercream stripes or a trendy watercolor effect like I did. You can then top it with sprinkles, candies, meringues, macarons, anything you can think of really— the crazier the better! Pro Tip: Try buying a bunch of different shapes and colors of sprinkles/sugars/sugar pearls and making your own mixes.
The last trend this cake tackles is the piñata cake— way better than a real piñata because you get to eat the outside too after you bust it open! It’s not as complicated as you might think. I’ll walk you through the steps, and in no time you’ll be serving up your own impressive (but easy) Chanukah piñata drip cake!
What you will need:
- Cake: Your own recipe or 2 boxes of your favorite mix (4-5 layers total), baked in 8” round pans
- Buttercream frosting: Your own recipe or your favorite store bought one. You will need about 8-10 cups of frosting.
- 1.5 pounds chocolate coins, unwrapped
- Gel food coloring in different shades of blue (or whichever colors you choose)
- 5” round cookie cutter
- Icing spatulas
- 12” round cake board
- Piping bag
- 4oz Heavy cream or Parve whipping cream
- 12oz chocolate, white chocolate, or colored candy melts
- Decorations: sprinkles, donuts, wrapped coins etc…
Step 1. Bake your cake. You can use your favorite scratch recipe or a cake mix, just make sure you have enough for a taller cake. You will need at least 4 layers, so if you’re using a cake mix make sure you make 2 boxes.
If you want to use the swirl technique for your cake to make it extra festive like I did, use a yellow or white cake recipe, reserve about 1 cup of batter and mix in enough blue food coloring to get your desired shade. Using a spoon, place a few dollops of blue in each cake pan (once you’ve poured in the undyed batter), and swirl the batter using a knife before baking.
Step 2. Cool and Remove Cakes. Once your cakes are out of the oven, allow them to cool in the pan for 10-15 minutes. Then dump them out to cool completely so that they don’t stick to the pan. Pro Tip: I always wrap my cakes in plastic wrap at this point and freeze overnight. I find this is beneficial in 2 ways: 1. The cake is easier to work with when frozen, and 2. It retains more moisture. If you go this route, remember to bake your cakes enough in advance to freeze them. It takes a bit more forethought and planning, but I promise it’s worth it!
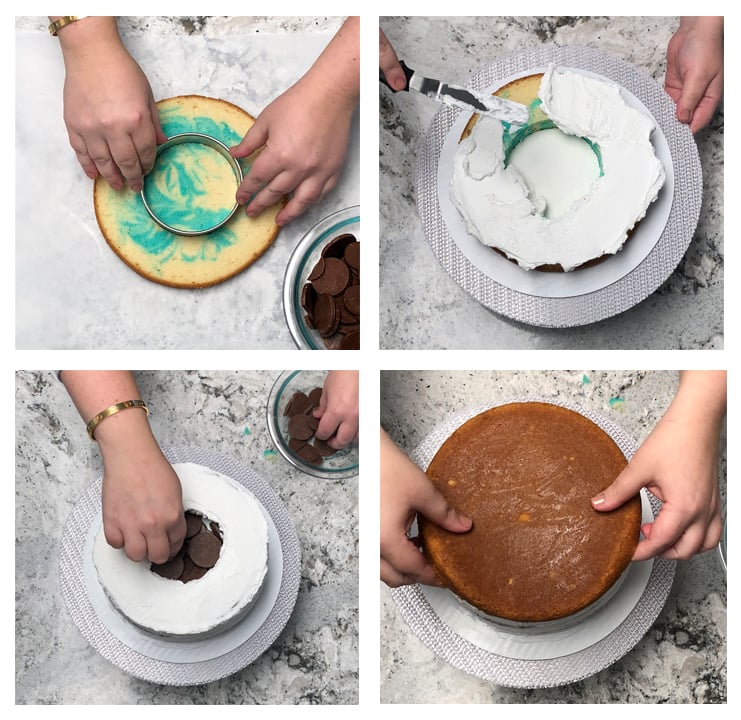
Step 3: Assemble your cake. Have everything you will need ready to go. Set up your work space. Unwrap your cakes, and start by spreading a small amount of frosting onto your cake board to hold your bottom layer in place. Place your first layer on the cake board, and top with a layer of buttercream, spreading a thick, even layer to the edge of the cake.
Take your next 2-3 layers of cake, and using your 5” ring cutter, cut the center out of each layer. One at a time, stack the layers, filling with buttercream around the ring-shaped cakes as you go. Once you are done, fill your center with your unwrapped chocolate coins. Finally, place your last layer on top to close it all up and crumb coat your cake. Your crumb coat is a thin layer of buttercream all around the exterior of the cake that seals in any crumbs before your final, thicker layer of frosting goes on. After the crumb coat, you’ll refrigerate your cake for at least 30 minutes for the frosting to set.

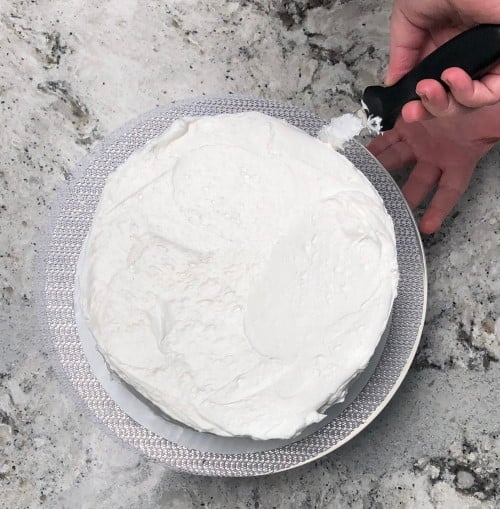
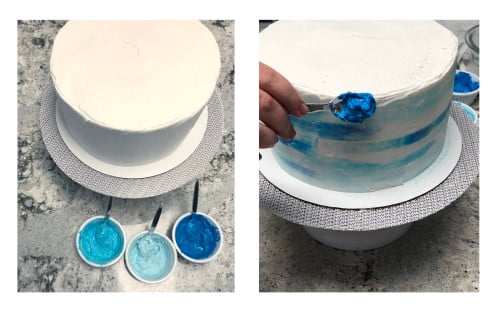
Step 4: Ice your cake. Remove your cake from the fridge, and frost it with a thicker layer of icing. Now is when you can get creative. Leave your frosting white, add some food coloring to your frosting, and frost your cake another color, or try my watercolor technique.
To achieve the watercolor technique, start with a white base, and divide a small amount of white icing between 3 separate dishes. Mix a small amount of blue coloring into each dish to get three distinctly different shades. You’re looking for gradients. Using the back of the spoon, dab a small amount of each color all around the cake in random spots. Do the same thing for each of the 3 colors in a random pattern. It’s not a perfect science.
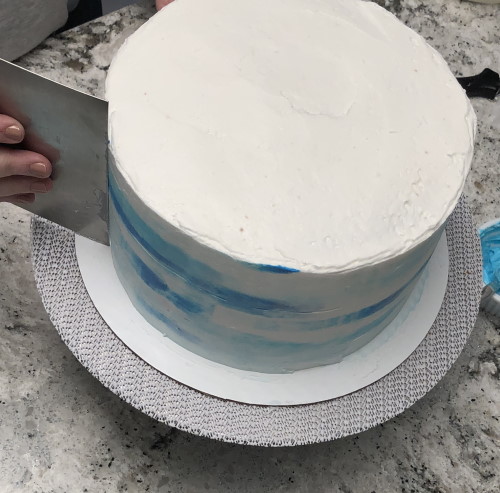
When you’re done, take your icing scraper and gently drag it around your cake to blend the colors together. You can continue doing this until you’re satisfied with your pattern. Put your cake back in the fridge to chill while you make your ganache.
Step 5: The drip! Measure out 4 ounces of heavy cream or Parve whipping cream and 12 ounces of your chocolate. Place the chocolate in a large bowl. Heat the cream in a pot on your stovetop over a low flame, stirring occasionally until just about to boil. Remove from heat and pour over the chocolate, shaking the bowl so that all the chocolate is coated in the cream. Allow to sit for 1 minute, then whisk together. If there are still pieces of chocolate, pop it in the microwave for 30 seconds at half power, then whisk again until it comes together in a smooth, shiny liquid. Allow it to cool a bit, you want it warm, not hot.
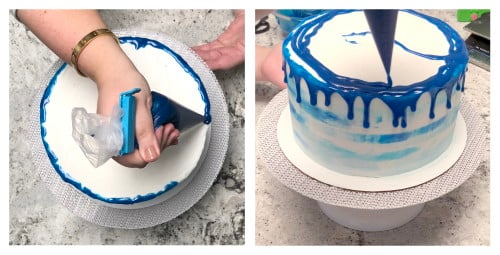
Prepare your piping bag- Pro Tip: I fold the sides over, and stick my bag inside a tall glass, this means I can use two hands to pour and scrape since I don’t have to hold my bag, and if anything drips, it drips on the inside of my bag since the sides are folded over.
Pour your ganache into your piping bag, and close off the top using a twist tie, rubberband, or bag clip if you have one. Remove your cake from the fridge. Snip a small hole at the tip of your piping bag. You’re going to start by piping your drips around the edge of the cake. Slowly start squeezing out the ganache around the edges of the cake so that it begins to drip down. ‘
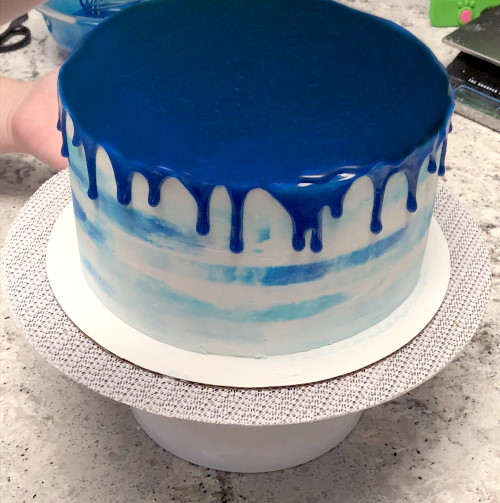
Remember, you don’t want too much ganache, gravity is your friend, it will continue to fall after you’ve moved on to the next drip, if you have too much, it will all pool at the bottom of your cake. Play around with pressure. You want variation in your drips. Once you’ve made your way around the edge, fill in the top and smooth it out with a cake spatula so you have a smooth, shiny top. It will start to harden as it cools.
Step 6: Decorate! While your ganache is setting up, add your decorations. The ganache will act as a glue and hold them on to your cake. I find it helps to plan out placement before putting anything on your cake because once it’s on, that’s it! The thing about a drip cake is you can never really have too much on it, so go crazy and have fun with it!
Step 7: Serve and wow your crowd! Just because you know how easy it was to make, doesn’t mean they have to! You can make this cake 2 or 3 days in advance, and refrigerate it until about 15 minutes before you’re ready to serve it.
So there you have it; an impressive looking, easy to make, Chanukah-themed dessert with a twist. Change it up for different occasions for a completely different look. The possibilities are endless! I can’t wait to see all your photos. Feel free to tag me on Instagram @sweettoothstl if you make one!
—————–
For more Chanukah dessert ideas, take a look at our Chanukah Donut Guide!
And fod more Chanukah deliciousness, check out our Ultimate Chanukah Menu!