
My, your children grew over the winter.
And that can only mean one thing-time to send a fresh round of pictures to Bubby.
But before you whip out your phone and start tapping, take a few minutes to up your photography skills. We turned to Raizy Ciment of Vivid Studios for some tips and tricks. She was incredibly generous with her time and answered the most common questions she gets about smartphone photography.
Note: We’ll be referencing various features and settings. There are a wide variety of phones out there, but you can usually access these features from your “Settings” menu.
1. How can I focus, set exposure, and compose pictures on my smartphone?
Your smartphone’s automatic features make it easy to take great pictures if you know how to use them.
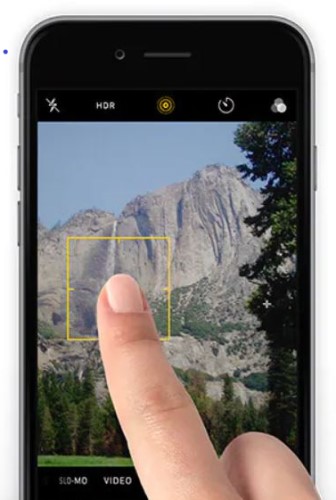
Focus: When you open the camera app, the lens takes in everything around you. It doesn’t know what you want to be the subject of your photo. Raizy gives an example of a person standing in a field of grass with trees. The camera app may decide to focus on the trees and blur the person! You need to tell the camera where to focus.
To do that, find the square or circle on your screen. That’s your focus point. Tap the focus point and drag it to where you want the sharpest focus to be. With people, that’s usually the eyes. “The eyes are the windows to the soul,” says Raizy.
Exposure: Exposure is the amount of light that your camera lets in. The more exposure, the brighter your pictures will be.
To control exposure on your smartphone, once again, open your camera app. You’ll notice a slider with a sun in the middle. (It’s a horizontal line on Androids and a vertical line on iPhones.) Move the slider right/up to increase brightness and left/down to make your photo darker. You can lock the exposure by double-tapping the slider.
Your camera app probably includes a manual settings option, too. Go to the manual mode of your smartphone camera and tap the MF icon. You’ll soon see a slider on your screen to manually control the focus, exposure, and more, just as you would do with a real professional DSLR camera. If your camera doesn’t come with this feature, you can easily download a third-party app to do it.

Composition: Composition is how you arrange the elements in a picture. “It’s similar to a good ad in the paper,” Raizy explains, “Don’t pack on too much information. Messy backgrounds and too much going on will be a distraction from your subject.” Raizy encourages her students to use negative space and to keep the background colors monochromatic and toned down. You want the subject to be the most attractive element in the shot, not lost in the other elements.
The other principle of composition is the famous “rule of thirds.” Imagine your photo is divided by two vertical lines and two horizontal lines into nine equal boxes. Or leave your imagination and toggle on your phone’s “Grid” setting.
When setting up your picture, don’t put your subject in the center square. Instead, place the subject a little to the left, right, up, or down, along the gridlines or their intersections. The effect is far more pleasing to the eye than a centered subject.

2. How do I get those magical blurred backgrounds?
“This is a very popular question,” Raizy begins. “You can achieve that look with three things.”
a) Portrait Mode is a setting on newer smartphones that blurs the background behind your subject. It mimics a low aperture lens, a pricey pro add-on to a regular camera.
b) Keep your subject far away from your background.
c) Keep your subject close to the lens.
Using those three techniques together will give your picture dreamy and magical results.
3. How can I position my subject for the best lighting?
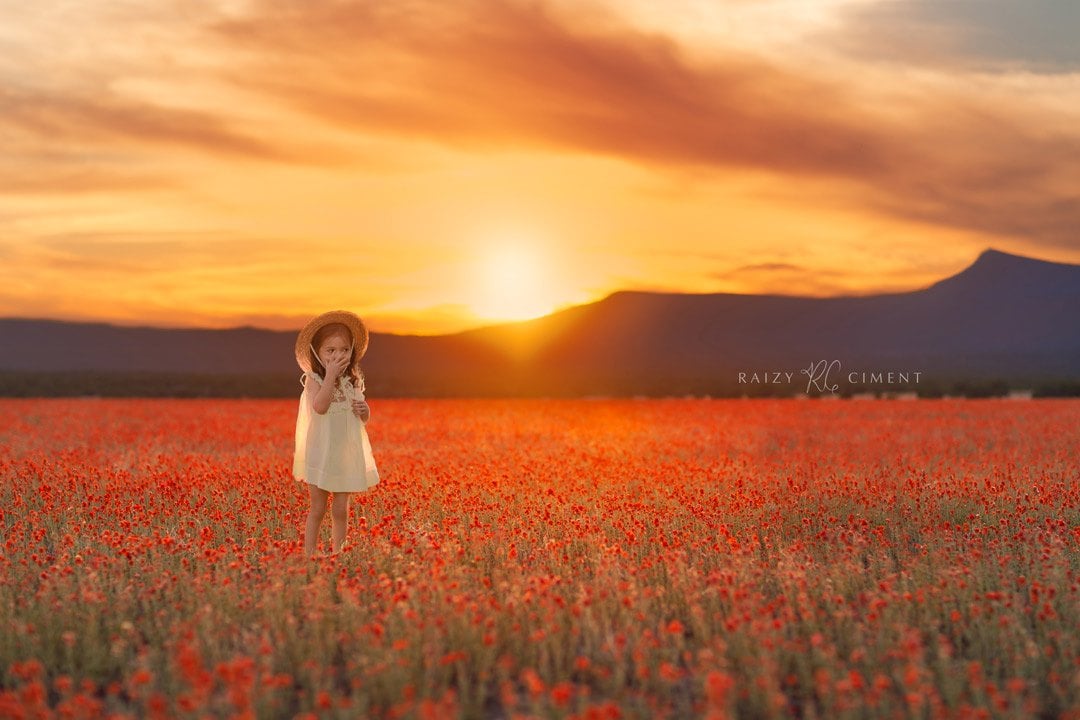
“Never shoot midday,” cautions Raizy. When the sun (or any light) is overhead, it shines down and creates harsh shadows. Instead, shoot with the sun hitting your subjects’ back. The soft light will flatter them and create a beautiful halo around their hair.
The best time for pictures is in the early morning or late afternoon, called the golden hour. It’s every photographer’s favorite! It creates a beautiful halo around your subjects, illuminating them from behind.
4. How can I take landscape pictures on my phone?
Portrait orientation is the taller, up and down view. Landscape is the wider, horizontal view. The default setting on most phones is locked in portrait orientation (not to be confused with Portrait Mode.)
But you can change your phone settings to allow “Auto-rotate.” When toggled on, your phone’s orientation will rotate when you physically rotate your phone. It doesn’t change in every app, but it will work with your camera.
Here, just like with portraits, it’s super important to leave negative space in your composition for the best landscape shots.
5. What are ways to add visual interest to my picture?
Raizy shares two pro suggestions that can take your pictures from ordinary to outstanding.

One is what she calls the “foregrounds for beautiful framing” technique. It sounds very fancy, but it simply means shooting your subject THROUGH something in the foreground. Some examples are branches, leaves, bottles and other glass, lights, or a vase of flowers. It will give your picture a beautiful, blurred foreground. Check out Raizy’s “Cherry Blossom Tutorial” for more details.
The second is to create a “painted look.” Visually, our brains appreciate monochrome tones. “It makes a 90% difference in the outcome,” says Raizy. Stick to one hue and add points of interest to it. That includes everything in your picture, from outfits to props to toys to the background.
For outdoor spring pictures, Raizy recommends white or light pink as your main color.
6. Can you give me some tips for posing children?
To Raizy, the most important tip for working with children is to capture life. “Don’t be super formal!” she says. You want to get the natural expression of your child because THAT’S what creating real memories is all about.
That’s easier said than done when your child’s current natural expression isn’t, shall we say, picture-worthy. But pro photographers have a few tricks up their sleeves:
1. Use silly words to make them smile. This classic still works! Raizy confides that the kids call her “Mrs. Sushi” because of her trademark “Who likes sushi?” or “Do you like sushi or lollies?”
2. In a variation on this theme, call a child by her morah’s name.
3. If you have more than one child in the picture, get them to communicate with each other. Let one child whisper in her sister’s ear or put something in his brother’s pocket.

4. Drop candy on the floor or between leaves outside. Watch the children relax into their natural selves as they pick through the leaves to fish it out.
5. Give babies a toy to hold. Infants are generally challenging to photograph since you can only shoot from a bird’s eye view. A better time to photograph them is when they can support themselves on their bellies or sit solo.
6. For older children, tune in to their interests. “What’s your favorite food?” or “Do you like to paint? Who did you vote for, Trump or Biden?” Watch the spark in their eyes light up their face.

When composing a group shot, keep in mind another photography rule-the triangle pose. Posing a group in a triangle, whether regular or inverted, is pleasing to the eye. It also prevents big gaps between heads and allows for negative space around the group.
Excellent lighting is also a must for children’s portraits. The better the lighting, the sharper your pictures, which is always a consideration when shooting children on the move. If you don’t have plenty of natural light indoors, opt for outdoor photos.
7. What editing tools do you recommend?
Raizy’s top two picks for editing apps are Lightroom and Snapseed. They’re both free and work on iPhones and Androids.
But Raizy cautions against over-editing your photos. “Less is more,” she says. Stay consistent with one type of edit to develop a style for your pictures.
8. What’s the best way to store and organize my pictures?
There are all sorts of picture storage apps out there with various price points and features. But Raizy keeps it simple with Google Pics. (That correlates to iCloud on your iPhone.) Her pictures automatically backup on the cloud, and it only costs a few dollars a year.
When there’s a memorable event, she can easily go through the photos and choose some for a printed photo book shipped directly to her home. “We used to have diaries, but we’re not in that era anymore,” explains Raizy. “This is the best present to gift your children. They look through the pictures on Shabbos afternoon and have a storybook of their memories. It’s a reminder of how to appreciate every minute.”
Are you inspired to try your own photoshoot? Would you like to learn more?
Exclusive to Kosher.com readers, Raizy is offering a discount on her moms’ and teens’ self-paced course! It’s available online or off-line on USB.
CLICK HERE AND USE CODE KOSHER.
You can also follow Raizy on Instagram here for more tips. Or take her fun quiz to test your photography skills here.


