The 25th of Kislev was associated with olive oil long before the events of Chanukah occurred. In the Mediterranean, olives meant for eating were picked green in the months corresponding to September-October, and those destined for pressing into oil were left on the tree to be picked in late November-December. Since ancient times, the 25th of Kislev has marked the end of the olive harvest. I guess that means that Chanukah time is also the birthday for every bottle of olive oil, and a birthday needs a cake! After a week of frying, frying, and more frying, I’ve got just the thing.

This olive oil cake is one of my favorites, and I love to prepare it for special occasions and celebrations. The recipe isn’t the quickest, but it does reward the effort you put into it. A light, moist crumb highlights the nuances of whichever olive oil you choose, so make sure you use quality oil. I like using a light, fruity olive oil like Arbequina (it’s sweetest when harvested fully ripe) or something more peppery with a little bitterness like Picual to add complexity and depth. This cake definitely can stand up to serving unadorned and makes for a simple, well-executed dessert.
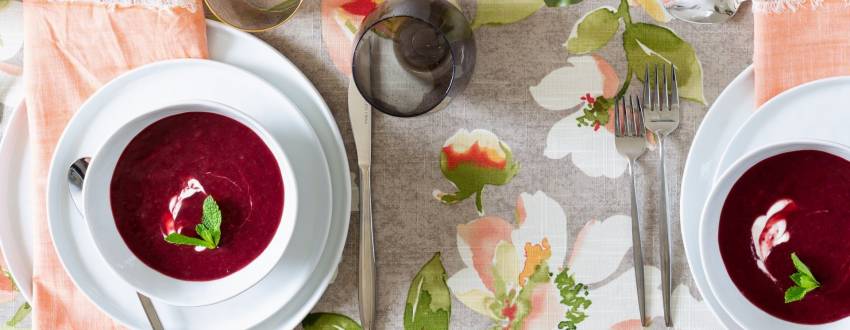
Alternatively, this cake makes a great canvas for dressing up. I garnish it with a circus of flavors and textures, and the cake is still strong enough to make its presence known. Here I show one presentation with fresh berries, walnut snow, raspberry dust, and honey rosemary whipped cream. (Remember what I said in my White Russian Rice Krispies article about transforming and transporting flavors into new forms? These are some prime examples, using encapsulation, drying/grinding, and infusing.)
Whereas angel food cake doesn’t have a significant fat content, chiffon cakes like this one have added oil for flavor and texture. The composition is a high-ratio cake, meaning there’s more fat and sugar than flour, and whipped egg whites provide lift.
To ensure a soft and tender cake with proper structure, you must use bleached cake flour. The bleaching process lowers the pH of the flour, in turn slowing the rate of starch gelatinization so it doesn’t soak up moisture as quickly as unbleached flour. This gives the cake more time to rise, with less interference to the growing network of air bubbles, thus reducing the risk that they will burst and leave you with a collapsed cake. The lower pH also inhibits Maillard browning reactions, preventing the cake from getting too crusty and keeping the flavors subtle and not overpowering.

My walnut snow garnish is a culinary magic trick — oil is turned into a fluffy dry powder that melts back into its original form in your mouth to gradually release its flavor. The secret ingredient is tapioca maltodextrin, a modified starch made by breaking up long polysaccharide chains of glucose. The maltodextrin molecule has the spiral structure of a helix — think DNA, but with one strand.
The inside of the spiral is hydrophobic (water-repelling) and binds whatever oil it encounters. Since maltodextrin has such a low density and large surface area (it can absorb more than its weight in liquid), the tiny oil droplets are kept far enough apart from each other that they are no longer perceived as wet. The dissolved oil now feels like a dry powder.
The outside of the helix is hydrophilic (attracted to water), and in the presence of water or heat, like in your mouth, it absorbs moisture, breaking apart the structure. The oil droplets are released and now free to coalesce together again as a liquid. (Feel free to make a maltodextrin-based dvar Torah about achdus, and let me know about it!)
My favorite application is dipping strawberries into powdered Nutella. You may not realize it, but you’ve encountered maltodextrin before if you’ve ever seen “modified corn starch” on a list of ingredients (it can also be made from wheat or any other starch). It’s used as a thickener in jello, a bulking agent, and in boxed cake mixes, to sequester liquid fat in a dry powder, just as I do here.
OLIVE OIL CAKE
(Adapted from ChefSteps)
Note: I prefer to bake by weight for convenience and accuracy, and it will lead to the best, most consistent results. Here I converted measurements from the original recipe for those who prefer measuring by volume. Just as with cooking meat, temperature is a more consistent indicator of doneness for baked goods. I give a doneness temperature here, but you can also fall back on the toothpick test if needed.
Ingredients:
- ¾ cup (167g) sifted sugar, divided
- 2 egg yolks (38g) from extra-large eggs
- 1 Tbsp (3g) lemon zest – from about two small lemons (make sure not to include the white pith, which is bitter)
- 2 Tbsp (25g) lemon juice – a little less than the juice from one small lemon
- 1½ tsp vanilla extract
- 1 cup (113g) sifted bleached cake flour (not unbleached; I use Wondra)
- ¾ cup (160g) extra virgin olive oil
- 3 egg whites (105g) from extra-large eggs
- ½ tsp (2g) Diamond Crystal kosher salt (or ¼ tsp if using Morton’s kosher salt)
Directions:
- Preheat oven to 325°F/163°C
- Combine ½ cup (110g) sifted sugar, egg yolks, lemon zest, lemon juice, and vanilla in a stand mixer bowl with whisk attachment. Mix on medium speed until incorporated.
- Gradually add flour while mixing. Once incorporated, pour in olive oil in a slow stream.
- Once fully mixed, transfer to a large bowl and reserve.
- Wash and dry mixing bowl and whisk, and set them up again.
- Add egg whites and salt to mixing bowl, and whisk on high speed until the eggs form a light foam.
- Gradually add ¼ cup (57g) sifted sugar, and mix until the foam holds stiff peaks.
- Using a spatula, gently fold the foam into the reserved batter, a third at a time.

- Coat a 9” springform pan with butter, oil, or margarine and dust with flour, tapping off excess flour.
- Pour batter into the pan, and bake to an internal temperature of 203°F/95°C as measured with a probe thermometer. This should take about 40-50 minutes (or if you mistakenly set the oven to 350°F as I did once during recipe testing, about 30-40 minutes). It will look soft but will harden appropriately as it cools. Once cooled, remove cake from pan.
RASPBERRY DUST
Note: Make raspberry powder by grinding freeze-dried raspberries in a spice/coffee grinder or mini food processor and sifting the powder through a fine mesh strainer to remove the seeds, making for a neater presentation. Tartness and sweetness can vary depending on the brand, so you may need to taste and adjust sugar, salt, and raspberry levels as you go.
Ingredients:
- 2½ Tbsp (33g) sugar
- 1½ tsp (6g) Diamond kosher salt
- 2 Tbsp (8 g) raspberry powder
Directions:
- Mix sugar, salt, and raspberry powder to combine. Reserve in a sealed container until needed
- To serve, sprinkle the raspberry dust over the cake through a fine mesh strainer, or for a more elegant presentation, sprinkle over a stencil design on the serving dish.
WALNUT SNOW
Note: The walnut snow is very hygroscopic (it absorbs moisture from the air), so to prevent it from melting, keep in a sealed container until ready to serve. It will also melt into wet ingredients like berries, so sprinkle on just before serving.
Ingredients:
- ¾ cup walnut oil
- Tapioca maltodextrin (e.g., N-Zorbit)
Directions:
- If you have a kitchen scale, start off with a ratio of 3 parts oil to 1 part maltodextrin by weight — don’t measure this by volume, because the starch is so fluffy it takes up a lot of volume. Pour walnut oil into a large bowl, and add the tapioca maltodextrin little by little, whisking as you go (you can also do this in a food processor). Adjust as necessary until the oil is fully absorbed and the powder forms small clumps with a chalky texture.
- Fluff up the walnut snow in a sifter or by pushing through a fine mesh strainer. Reserve in a sealed container until serving.

HONEY ROSEMARY WHIPPED CREAM
Note: I use a whipping siphon for my whipped cream, but this infusion technique can be adapted to your favorite stand (or hand) mixer whipped cream recipe — it will require coconut cream and different measurements. Bear in mind that since whipped cream is less dense than the cream base it’s made from, the flavors will be less potent. Because of this, the base should taste sweeter and more intense than you intend the final product to be. To make this recipe dairy, use one cup of heavy cream and halve the rosemary and honey.
Ingredients:
- 13.5 oz can coconut milk (not light)
- 1 Tbsp dried rosemary
- 3 Tbsp honey (or 4 TBSP if you prefer it sweeter)
Directions:
- Heat coconut milk, rosemary, and honey to boiling in a saucepan, stirring to dissolve the honey. Turn off the flame and let steep for 20 minutes to infuse. Strain, let cool, and refrigerate until very cold throughout.
- Using a whipping siphon, pour cream base into siphon, seal, charge with N2O cartridges (one for a half-pint siphon, two for a quart siphon), shake, and dispense.
———-
Sources:
ChefSteps
Gil Marks – Encyclopedia of Jewish Food
Harold McGee – On Food and Cooking
Stella Parks – BraveTart