Sponsored by Shibolim

Looking for challahs that are fluffy, flavorful, and all-around fabulous? You’re in luck! I’ve created four uniques shapes (with tutorials) plus a very special challah recipe featuring Shibolim White Whole Wheat Flour.
Here are a few tips and tricks for whole-wheat challah success.

1- Use a good quality reputable brand of flour like Shibolim.
2- Whole wheat flour doesn’t absorb water the same way traditional white flour/bread flours do. WW takes an extra amount of time absorbing liquids; so you want to keep that in mind when making your challah dough. You want a slight bit of stickiness which will dissipate as the dough rises.
3- Adding two tablespoons of vital wheat gluten (a natural protein found in wheat) in addition to your whole wheat flour will help the texture and elasticity of the dough. Vital wheat gluten is a perfect addition when baking with whole grain flour which has trouble developing enough gluten.
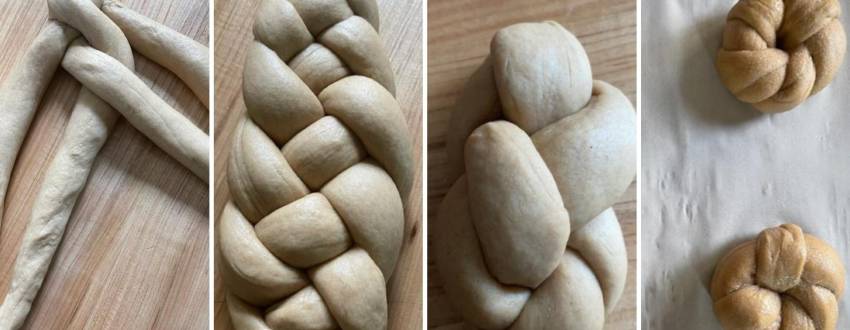
FOUR BEAUTIFUL CHALLAH SHAPES
4-STRAND CHALLAH:

Directions:
1. Starting on the right- 4 goes between 1 and 2, 1 between 3 and 4, 2 crosses over 3, and then repeat.
UNDER OVER CHALLAH:

Directions:
1. Starting on the right, 4 goes under 3, over 2, and under 1. Repeat the same steps all the way down, starting from the piece all the way to the right; the last strand on the right is always going to be 4.
2-STRAND CHALLAH:

Directions:
1. Use anywhere from one to two ounces dough per strand. Roll two strands of dough and lay them across each other to form an X shape.
2. Cross the left and right sides of the bottom strand so they cross.
3. Repeat with the other two strands; back and forth as you work your way down.
WOVEN CHALLAH ROLL:

Directions:
1. Working with one three- to four-ounce piece at a time, roll each portion of dough into long rope.
2. Tie in a loose knot, leaving two long ends.
3. Wrap/weave the left end of the dough up and over the loop.
4. Repeat with the right side.
THE CHALLAH RECIPE YOU’VE ALL BEEN WAITING FOR
Ingredients:
- 1 cup warm water
- 1 cup natural sparkling water
- 1/2 to 3/4 cup sugar (depending on your preference)
- 1 tablepoon dry yeast
- 2 large eggs
- 1/2 cup canola oil
- 5 to 6 cups Shibolim White Whole Wheat Flour (add as needed; temperature and humidity play crucial roles)
- 2 tablespoons vital wheat gluten/ bread improver (optional but strongly recommended) OR approx 1/4 to 1/2 cup white bread flour
- 2 teaspoons fine pink sea salt
Egg Wash:
- 1 egg plus 2 yolks, beaten with a bit of water
- you can add some sugar or honey as well
Directions:
- Proof yeast by mixing 1 cup warm water with sugar and yeast. Once bubbles or foam appear on the surface you’re good to go.
- Add 1 cup sparkling water, oil, and eggs.
- Add 4 to 4 and 1/2 cups flour, salt, and the 2 tablespoons vital wheat gluten and begin to mix (I mix on medium speed). Continue to add flour until the dough comes together around the dough hook. The key to a successful whole wheat challah is to know when to stop adding flour. Your dough should still be sticky- whole wheat flour absorbs water at a slower rate then white flour- the stickiness dissipates as the dough rises. It’s much easier to add more flour later then to fix a dry dough.
- Knead dough for five to seven minutes on medium speed. Transfer to a greased bowl and cover loosely with plastic wrap. Let rise till doubled in size.
- Gently remove air and use a serrated knife to divide the dough into balls; Place balls on a greased tray and cover with greased plastic wrap or a clean lint-free kitchen towel to rest for 10 minutes.
- Lightly flour your work surface or work on a non-stick pastry mat and shape your challah as directed above.
- Place shaped challah on a parchment lined metal baking sheet or greased tin. Cover and let rise approx 30 minutes.
- Dust with flour or gently egg (as directed above) and bake until golden.
Note that this amount of flour is not enough to “take challah”. Read more about Hafrashat Challah HERE!
I hope this recipe and these beautiful challah shapes enhance your Shabbat tables!


