By Jackie from Home Over House
I’m so beyond thrilled to be partnering with Kosher.com once again to bring you creative, unique, and delicious creations that you can make yourself! This week we observe the holiday of Tu Bishvat, celebrating the trees and everything this beautiful earth has to offer.
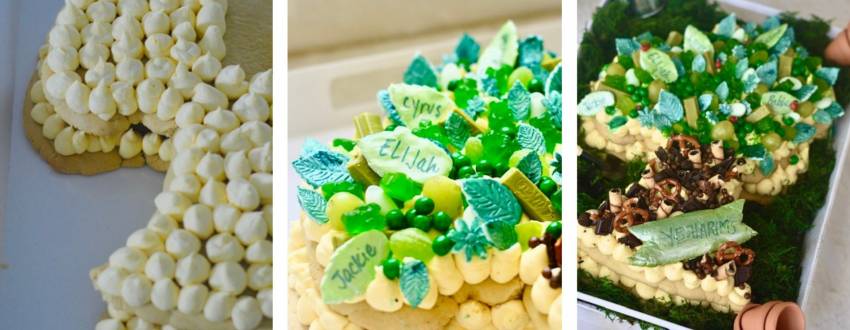
We wanted to make something extra SWEET, and something personalized for your own family, which is how we came up with this twist on the classic “number” tart cake that’s so popular for birthdays for the endless unique toppings it can hold.

But! We added a twist! We created the tart cake in the shape of a tree, with the names of each family member on the “leaves” to represent the tree of life! It’s such a great way to show off your family tree while enjoying the “fruit” of your labor! In this case, you can have your cake and eat it, too!
Down below you will find the detailed recipe. I do urge you to get your kids or spouse involved with creating this. My kids LOVED creating their own shapes and toppings using fondant and stamps to create adorable leaves and flowers. You can add whichever fruits you’d like or that you think represent Tu Bishvat best! Happy baking, and have a happy Tu Bishvat!
You Will Need:
- 1 recipe cream tart dough & frosting (I used this recipe by SugarHero)
- Flowers, berries, meringues, candies, and other decorations
- Leaf cookie cutters
- Green fondant
1. Trace a large tree onto parchment paper and cut it out. Roll out your dough, then lay the parchment tree atop the dough and trace the shape with a sharp knife. Repeat so you have two large tree-shaped cookies.


2. Bake as directed and let cool before decorating.


3. Lay the first cookie on a large white tray or flat platter. Fit a piping bag with a round coupler and fill it with your frosting. Pipe rows of frosting all over the first cookie, covering the top surface completely. Gently place the second cookie on top and repeat the frosting pattern.

4. I used cookie cutters to create leaves and flowers from fondant, and wrote our names with edible marker. You can find these online, at a baking store, or your local Michaels.
5. Decorate the top of the cookie with the leaves as well as fresh flowers, fresh berries, candies, macarons, or anything else you’d like! It looks best when covered with a colorful assortment of treats.
6. Once your cookie cake is fully decorated, add moss, terra-cotta pots, shovels and mini watering cans to complete the look.


When leaving comments on kosher.com we ask that you be respectful, appropriate, and stay on topic. Click here to read our full comment policy.
Kosher.com Commenting Guidelines
We love hearing from our community! Constructive feedback, tips, questions, and friendly engagement are encouraged.
By commenting on Kosher.com, you agree to follow these guidelines. Please note that comments are for community discussion only and should not be considered halachic guidance—always check with your own Rabbi or LOR.
1. Be Respectful
2. Keep It Appropriate
3. Protect Privacy
4. Stay On Topic
5. Moderation