Apple Challah Crowns

Rochie Pinson Rochie Pinson
Leave a review

This recipe and challah design were created exclusively for Whisk Magazine. You can use any challah recipe to create this shape, but the apple challah is fabulous! The taste of apple and cinnamon comes through in every bite, but it still manages to taste like challah, not cake. I keep the apples unpeeled so you get little bits of green and red throughout the challah, which adds to the special Rosh Hashanah feel.

3h 10
Easy Vegetarian Pescatarian Parve Freezer-Friendly

Contains: Egg, Gluten, Wheat

Directions

Prepare the Dough

  1. Place water, sugar, honey, and yeast in a large bowl or the bowl of your mixer.

  2. Add oil, apples, eggs, vanilla, and cinnamon. Stir to combine.

  3. Add half the flour and salt, then stir until smooth.

  4. Add the rest of the flour gradually, using only as much as needed for the dough to pull away from the sides of the bowl.

  5. Knead dough until smooth and elastic, then place in a warm spot to rise until doubled in size.

  6. Preheat oven to 375 degrees Fahrenheit.

  7. Let the air out of the dough and start braiding.

  8. Allow braided challah to rise until puffy (about one hour).

  9. Bake for 20-30 minutes, depending on the size of your challahs.

Braiding Instructions

  1. Use 9 ounces of dough per individual challah crown.

  2. Divide each piece of dough into six smaller pieces of 1 and 1/2 ounces each. Roll four of the pieces into equal-sized strands.

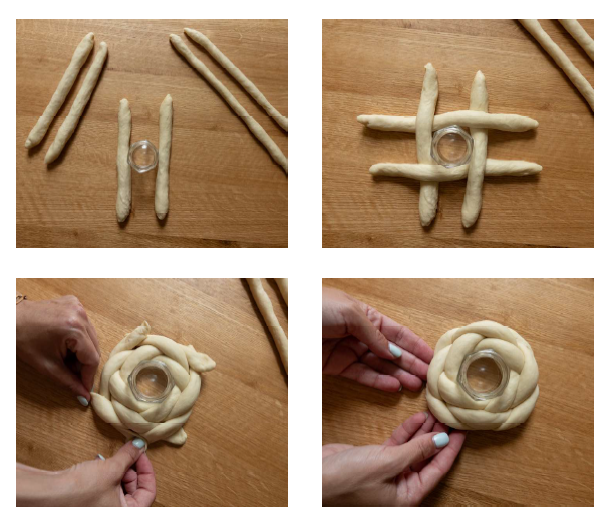
  3. Place two of the strands vertically alongside a small glass, like a mini honey jar or shot glass.

  4. Place the other two strands horizontally across them like a tic-tac-toe with the glass in the center. “Weave” one strand over and one strand under. Now you have four “sets” of two parallel strands next to each other.

  5. Each set has one “under” strand and one “over” strand. Take the “under” strand and cross it over the “over” strand.

  6. Now you’ll do the same thing, working the other way around. Cross each “under” over the “over” strand near it. Go back around the first way if you still have enough length in your strands, then tuck ends underneath.

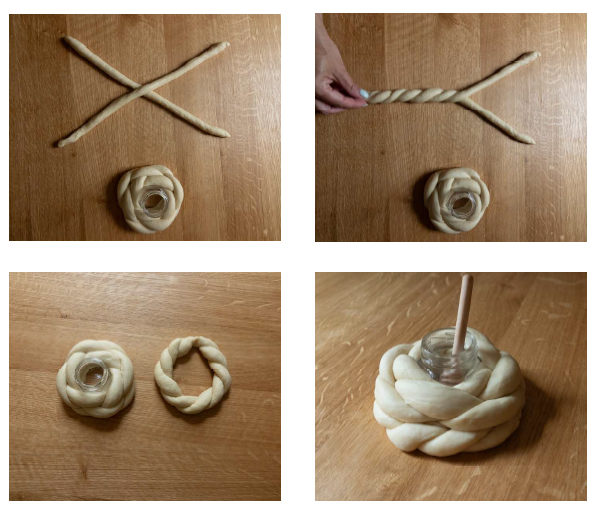
  7. Take the remaining two strands and roll until they are very long and skinny. Cross in the center.

  8. Twist from one side and then the other.

  9. Close the twist into a circle.

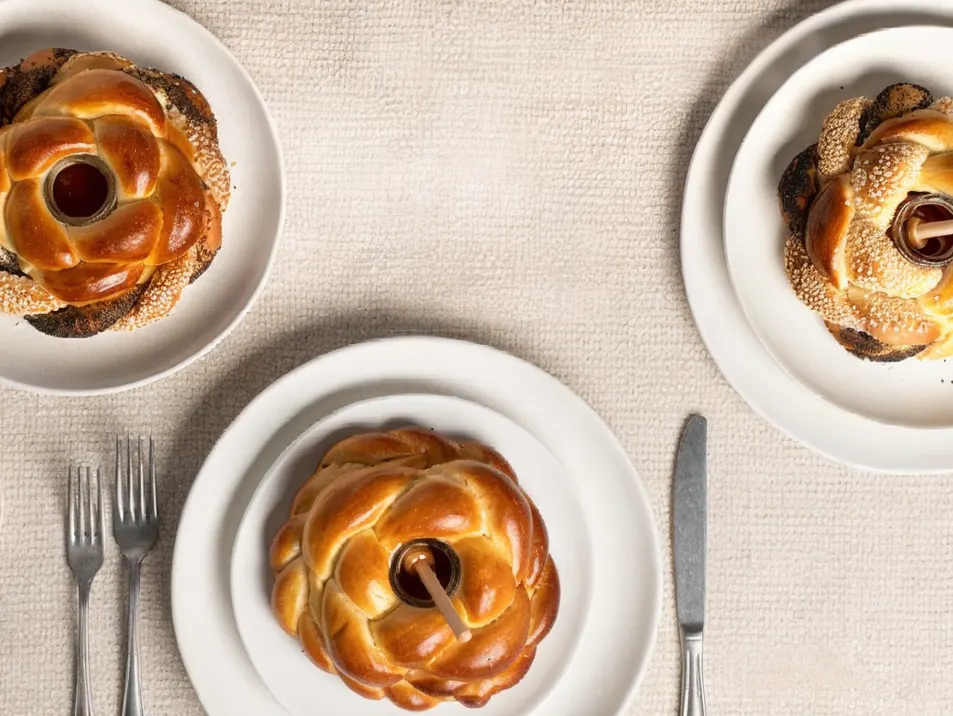
  10. Place the weave braid with the glass on top. The twist should extend slightly outward from the weave braid to create a crown effect.

Coating

  1. To make it look even more special, coat some of the strands with seeds (poppy, sesame, caraway, etc.). Prepare each type of seed on its own plate or tray.

  2. Roll the dough strand on a piece of wet paper towel to slightly moisten it, then roll it around in the tray of seeds.

Credits

Tips:
If you want to keep one strand plain and one with seeds, lightly coat the plain strand with flour so that the seeds from the other strand don’t stick to it.

Description:
Photography by Chay Berger

Suggested Recipes

Explore

apples challah crowns fall flavors Rochie Pinson simanim
Did you make this recipe yet?

Photos from Our Community

Tell Us How It Went: Share Your Experience

2 Comments

Raquel Malul Kosher.com Team •

Diagram of braiding

Tehila Chesir •
Marked as Question

It looks like the skinny twist goes on top of the weave braid because you make the weave braid first around the glass.

However, it says to put the weave braid on top of the twist.

Does that mean the glass isn't really flush with bottom anymore?

Raquel Malul Kosher.com Team •
Reply to Tehila Chesir

Hi Tehila, I have attached a diagram of the braiding for you to see if that helps make it more clear!