I recently spoke with two business acquaintances who own two completely different craft businesses. I’m so happy for them. They both told me that their businesses boomed during Covid-19 as the world was home bound, trying to keep themselves and their families busy with happy things while in quarantine.
Personally, one of the craft products that I became more familiar with was bleeding tissue paper mosaic. I’ve used bleeding tissue paper before, but the Hygloss Mosaic squares and circles were so convenient, fun, and easy to use.

For those of you who are unfamiliar with bleeding tissue paper – it sparks the imaginations of even the youngest children. This special type of tissue paper 'bleeds' color when mixed with water, making it perfect for easy to create abstract designs.
It’s suitable for art projects for as young as ages 3+.
The bleeding tissue paper squares in this kit come in 20 assorted colors and can be used on a variety of surfaces, including fabrics, canvas, paper, wood, and more!

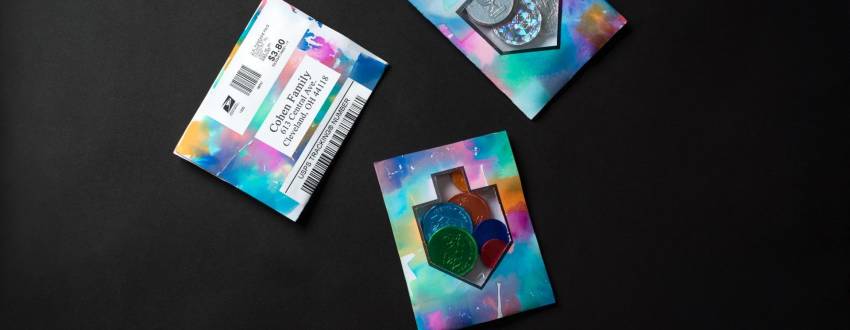
I used this technique to create these adorable Chanukah pouches.
I got this kit which comes with mini spray bottles so the project doesn’t get too messy.
Since this year won’t be spent with a large crowd, these pouches are perfect for sending family and friends across the country your warmest Happy Chanukah wishes. Yes, these pouches are mailable! I mailed one from NJ to Pennsylvania. The cost to mail it was approximately $3.80).

Whether or not you decide to make these pouches, this kit is great for keeping your children busy.
For an added effect, use a white crayon to create a design on your project. The crayon acts as a resist, not allowing the color to stick to the paper. As a result, after you remove the tissue paper, the design or text you made with the crayon will appear.
Although bleeding tissue paper does work with any card stock, it does work much nicer with art board. The art board that I used came in the kit as well.

Supplies:
- Chanukah gelt
- 4x6 cellophane bag
- Scotch tape
- Clear round labels
Directions:
Copy the free download onto your art board. Make sure to copy on the shiny side.
Using a razor blade or scissors, carefully remove the dreidel to create a window. If using a razor blade, place on top of an old newspaper or magazine so you don’t ruin your surface. This step should be done by an adult.

Cover your work surface to make cleanup easier.
Choose whether you’d like to use the crayon resist for your project. If so, draw a design or words with white crayon. This design will show up after you apply the squares. NOTE: Because you are drawing white on white, your drawing won’t be visible until the end.

Pre-wet the art board by spraying it with the spray bottle filled with water.
Apply the tissue paper squares and spray some more water over the squares to create the “bleeding” effect.
For best results, allow the water to dry before removing the squares.
Once you remove the squares, the color will have transferred onto the art board, revealing your drawing and the color from the tissue paper!
Place the gelt in the cellophane bag and fold in half. Tape it closed and then tape it down on the inside of the card, the side without the dreidel.
Seal the card on all four sides using tape or round clear seals.
______________________________________________________________________
In case you missed it, check out Esther’s adorable Chanukah Hot Chocolate Bombs!
Looking for more edible crafts to make this Chanukah? Check out all of them here!
Author: Esther Ottensoser
Esther’s passion is using creativity to bring the little joys to life.
She connects with her fan club through her website, https://estherodesign.com/ and through her plate art
column in Mishpacha's Family First Magazine.
Photography: Hudi Greenberger

When leaving comments on kosher.com we ask that you be respectful, appropriate, and stay on topic. Click here to read our full comment policy.
Kosher.com Commenting Guidelines
We love hearing from our community! Constructive feedback, tips, questions, and friendly engagement are encouraged.
By commenting on Kosher.com, you agree to follow these guidelines. Please note that comments are for community discussion only and should not be considered halachic guidance—always check with your own Rabbi or LOR.
1. Be Respectful
2. Keep It Appropriate
3. Protect Privacy
4. Stay On Topic
5. Moderation