Please enter the email you’re using for this account.


 Meat
Meat Easy
Easy 16 Servings
 Allergens
 No Allergens specified
 2 Hours, 30 Minutes
 Diets
Diets No Diets specified
When I was thinking of a way to celebrate a special family birthday, I had to think out of the box. As the owner of Dairy Dreams, a boutique cheesecake company, nothing dairy would do the trick. While brainstorming with Rechy F., a close friend and owner of One Smart Cookie Israel, I learned of a new trend in the world of cakes: the steak cake. What could be more innovative than a fleishig cake for someone who spends so much time creating milky delicacies? But as much as I was intrigued by the idea, the aesthetics of meaty cakes just did not appeal to me. Honestly, I found them nauseating and off-putting.
Still, I was captivated by the idea. And so I challenged myself: Could I take this idea and make it palatable, even beautiful?
The results were astounding. The cake looked beautiful. No one at the party could figure out what exactly it was made from, but when we sat down to enjoy the meal that the cake provided, everyone agreed that it tasted even better than it looked!
It was only the next day, following that Adar birthday, that I realized something important: This cake is 100% Pesachdik…for everyone! No matter what your chumros are—no peels, no potato starch, no storebought items, no chicken or fish— whatever it may be, this cake can work for you! Try it!
Throughout the instructions I used only basic equipment that most people have at home, even on Pesach. The only thing you might need to buy is a nozzle/piping tip and a piping bag. So go ahead, follow the instructions and feel the celebration in the air on this Yom Tov of cheirus.
Note: The quantities listed in the ingredient list are suitable for an 8-inch pot.
In the photo gallery, there are many step-by-step pictures of the process to create this cake.
pot/salad bowl/round container
cake board/dish, to hold final cake
cake board to go inside pot, optional
plastic wrap
potato ricer/fine-mesh metal sieve or strainer
star-shaped piping tip
piping bag(s)
bowls
6 pounds potatoes, divided
2 and 1/2 pounds chunked meat, cooked until moist
5 medium sweet potatoes, divided
fried onions (optional)
pastrami in multiple colors (optional)
parsley leaves (optional)
Cook the meat with desired flavorings until fully cooked and tender. The smaller the chunks of meat, the easier it will be to cut the cake to serve.
Prepare two sweet potatoes, cubed and grilled with kosher salt (optional). This adds texture and color to the final outcome.
Prepare three pounds of potatoes, cooked and coarsely mashed for additional texture and flavor. Add salt, pepper, and fried onions to taste.
Line the inside of your chosen pot/container with plastic wrap. For easier handling, prepare a doubled-over piece long enough for the entire circumference and use that to line the sides. Use a separate piece of plastic wrap or a cake board to line the base of the pot.
Starting with mashed potatoes, layer: potatoes, meat, potatoes, sweet potato chunks, potatoes, meat, potatoes. The smoother each layer is, the nicer your final outcomes will be.
Place the entire cake in the freezer for 45–60 minutes. This cake can be prepared in advance and fully frozen, but it will need to be fully warmed in the oven before serving. Note that freezing the cake causes the decorations to separate from the cake, no longer sticking to the potato layer added afterward. While the cake is in the freezer, start preparing your potatoes and sweet potatoes for the decoration.
Use what remains of the mashed potatoes from the cake filling, or use 4 of the potatoes cooked for the decoration and blend them with a stick blender to form a gluey texture. This will be used for what is referred to in cake-decorating terminology as a “crumb coat.”
Remove the cake from the freezer and invert it onto the cake board (to hold the final cake). Pull gently on the plastic wrap to release the cake. If the cake is too frozen, use the warmth of your hands or a blowtorch on the outside of the pot to help release it.
Remove the plastic wrap.
Using your smooth and sticky “crumb coat,” seal in the potato cake by spreading a smooth layer of blended potatoes onto the semi-frozen potato cake, creating a smooth, white cake.
Use any knife or spatula to cover the cake in the “crumb coat.” Using a sharp-edged instrument or an offset spatula will create sharper edges for the cake and a neater final product. You are now ready to start decorating!
Cook the remaining potatoes and sweet potatoes separately until soft. If a fork can be inserted and removed easily, the potatoes are ready.
As soon as the potatoes are cooked, strain them to remove all of the water they were cooked in. Leaving them in the water allows all the starch to leave the potatoes.
In order to achieve a very smooth cream that can easily be piped to form flowers, the ideal time to work with the potatoes is while they are still warm. Blending potatoes creates a gluey consistency that will not hold. For this reason, do not use an immersion blender when making the potato cream.
Mash potatoes by pushing them through a fine-mesh metal strainer, potato ricer, or any metal item with tiny holes. The potatoes should be completely smooth.
The sweet potatoes can be blended to form a smooth paste, but be careful not to overmix.
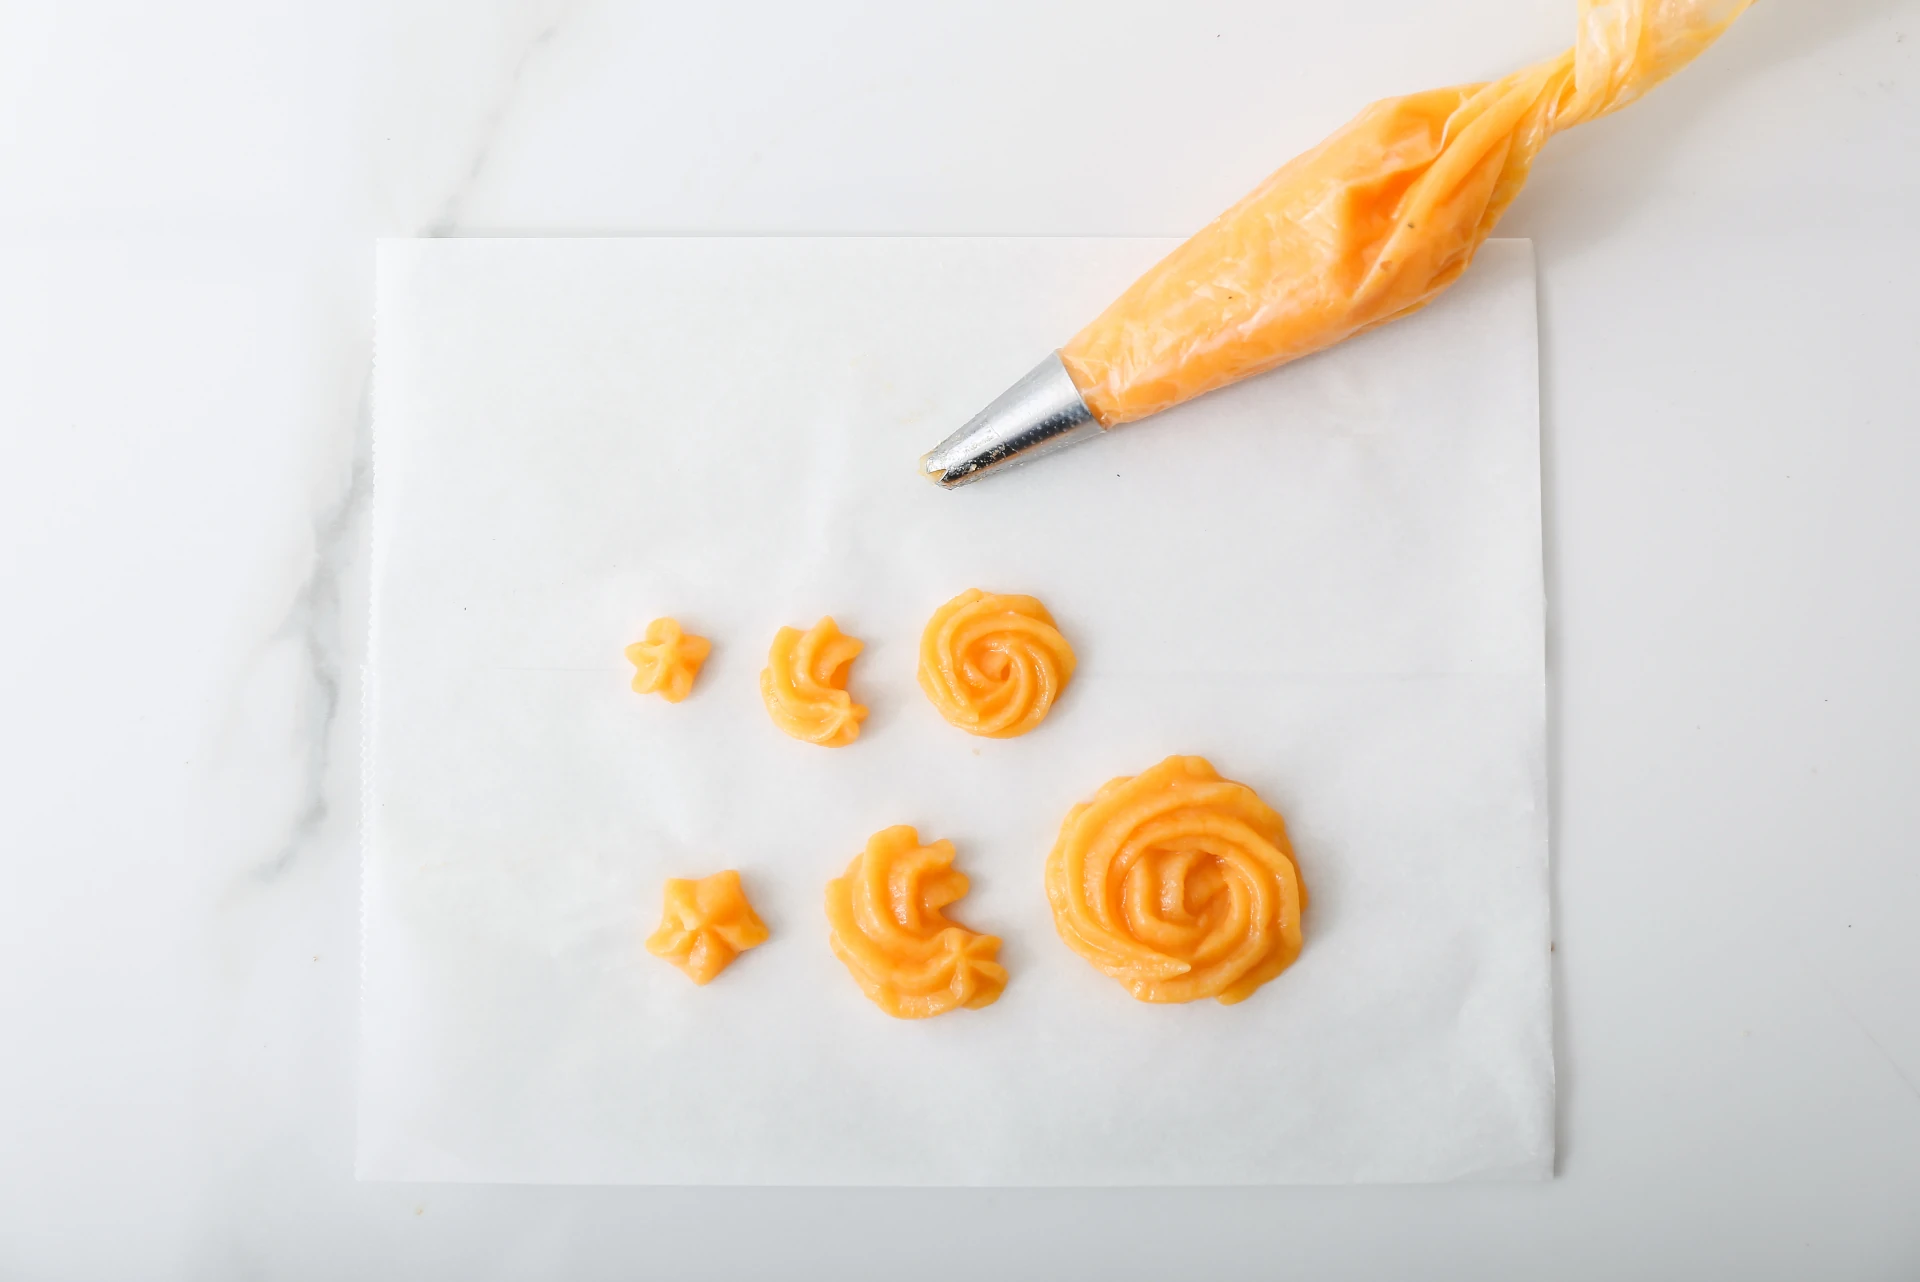
Place the star-shaped tip into the piping bag and cut the edge of the bag as needed to suit the tip. Cutting on an angle allows the tip to rest more securely within the bag.
Use a tall cup or container as a stand and open the piping bag, folding over the edges, so that the uppermost edges of the bag stay clean.
Place 80 percent of the sweet potato mixture in a small bowl and add 1/4 cup to 1/2 cup of the smooth mashed potatoes. Mix with a spoon until completely incorporated.
Fill the piping bag 1/3 of the way with the orange mixture. Do not overfill. An overfilled bag is very hard to maneuver for neat piping.
On a piece of baking paper, practice making a few rosettes before piping onto the cake. Starting from a center point, pipe a dot and continue piping around it.
Keeping your bag horizontal to the cake, pipe a row of small roses all the way around the base of the cake.
Pipe all remaining potato mixture into the bowl, leaving an empty piping bag.
Add between 1/2 cup and two cups of plain mashed potatoes to the orange mixture to create a lighter orange cream.
Repeat steps 4 through 8 three times, moving up the cake. With each layer, check that the color difference is noticeable enough and graduated enough. You may need to add in a full two cups of mashed potatoes. You can do as many layers as you choose with as many shades of orange as you like, just ensure that the second-to-last layer is close in color to the original mashed potato mixture.
For your final layer, start with the original mashed potato mixture and add in two to three spoonfuls of the light orange mixture you have left from the previous layer to achieve a white color that still matches the tone of the rest of the cake.
Pipe the final layer at the top of the sides of the cake and then continue going around the cake, filling in the top of the cake until you reach the center. The topping of the cake is optional and can be done with anything that you use on Pesach. I personally do not use store-bought pastrami, though if you do, that is one option. If you do not use bought food, I recommend fresh vegetable shavings made from peeled carrots and cucumbers or a combination of fried sweet potato strips, fried onion strips, and fried beet shavings.
Photography by Pessi Piller
How Would You
Rate this recipe?
Fast answers grounded in site content.

When leaving comments on kosher.com we ask that you be respectful, appropriate, and stay on topic. Click here to read our full comment policy.
Kosher.com Commenting Guidelines
We love hearing from our community! Constructive feedback, tips, questions, and friendly engagement are encouraged.
By commenting on Kosher.com, you agree to follow these guidelines. Please note that comments are for community discussion only and should not be considered halachic guidance—always check with your own Rabbi or LOR.
1. Be Respectful
2. Keep It Appropriate
3. Protect Privacy
4. Stay On Topic
5. Moderation