If your Instagram feed is filled with culinary and confectionary influencers like mine is, you start to notice trends popping up. And then you start to notice as everyone puts his or her own spin on it. (Think: 9 different ways to make avocado toast, or those over-the-top milkshakes, piled high with pretty much anything you can think of.) The chocolate log started as just one such trend, but it has quickly become my new best friend.
When I first saw these popping up, they intimidated me. They were so pretty and impressive looking, I honestly thought they were beyond my abilities.
With cakes and cookies, I’m not easily scared off. I’ll push myself to tackle extreme challenges. But small pastries—tortes, entremets, and other really technical stuff (basically anything that looks like it requires a mold)—I tend to stay away from those out of fear. For months, I admired chocolate logs from afar, always assuming they required hours of work and many, many steps.
That is until the challenge was presented to me to create a Purim-themed chocolate log for Kosher.com. I felt determined to take it on. I’m so glad I did, because my subsequent research on chocolate logs completely dispelled all previous beliefs I’d held on their complexity. Now I have a new, incredibly easy dessert in my repertoire that lends itself to tons of creativity and looks super impressive at the end!
So what is a chocolate log?
Well, it’s really simple actually. It’s basically a chocolate ganache, poured into a log form, left to set, and then sliced. The fun comes in when you think about all of the things you can add to that ganache to give it a little extra something special.
There are definitely some favorite filling ideas floating around social media; Praline, lotus butter, and halvah seem to be the top three flavors. But I found myself wondering… what would happen if I crushed up some hamantaschen and mixed them into my ganache?
Would it work? Would they get soggy? Would it taste good? I wasn’t sure, but I was determined to try. So, I ordered my log mold, limiting myself to only three impression mats to accompany it (there are so many to choose from to give the impressive, polished look of the finished product with no real effort whatsoever) and waited patiently for it to arrive.
I have a confession to make: I used store bought hamantaschen. I can already hear your horrified gasp, “Store bought?! But you’re a baker!” I know, I know, but I also work full time and homemade hamantaschen are time consuming. If this was going to fail, I was not ready to dedicate that amount of effort to my failure. Plus, I only had 3 jars of my favorite filling (which I also can’t get here), and I needed to ration it for my own Mishloach Manot 😉
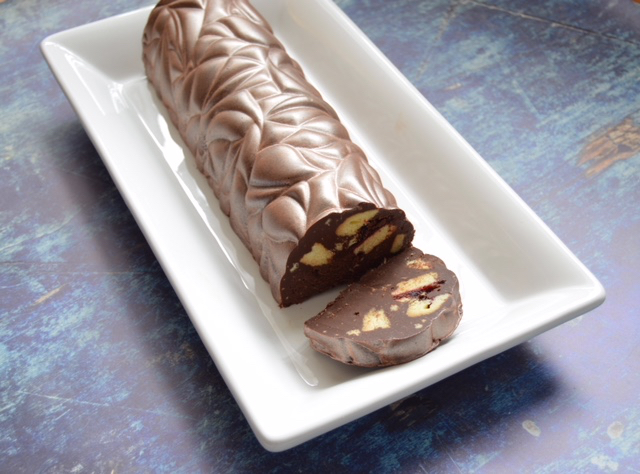
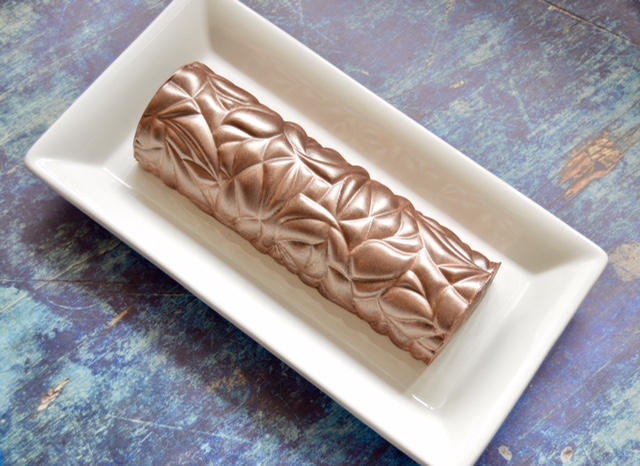
With raspberry hamantaschen now in hand, I set off to work. I made my ganache, crushed up my hamantaschen, mixed it all together, poured it into the mold, put it in the freezer, and waited. Once it had set, I carefully unmolded it and breathed my first sigh of relief as it came out in one piece (looking pretty cool with the texture mat, I might add).
Then came the taste test. There was no sense in decorating it if it was going in the garbage, right? I sliced in and was immediately excited to see the scattered chunks of cookie and raspberry throughout, still intact. I was even more excited when I took a bite and realized how delicious it was!
My mind began to wander with the possibilities. I could make any number of flavors to mix inside!
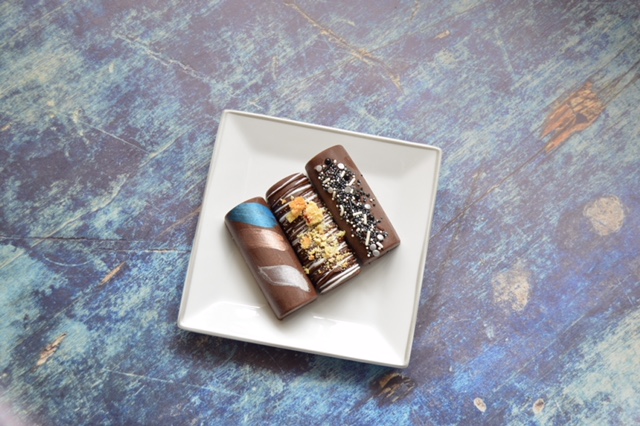
Next came the decorating. Inserts come with a lot of molds online (and more options can be purchased separately). These are the easiest choice as they add pattern and texture to your log right from the very start.
All you do is line the mold with your insert before you pour your chocolate in, then when it’s set, you peel it off, and leave guests wondering how in the world you created something so intricate and complex. (It’ll be our little secret.)
Other options for decorating include luster dust mixed with some vodka (it acts as a paint and then the alcohol evaporates), chocolate drizzle, crushed cookies, sprinkles, fondant accents and more. Like I said, it’s versatile.
So, here’s how to make your own hamantaschen chocolate log. If you’re going all in on this trend, you can buy molds on Ali Express with a whole set of insert mats (there are also options to just purchase one or two). If you don’t want to wait for it to come from China, you can also find molds on Amazon. And, if you don’t want to invest in a mold at all, just lay out a long piece of plastic wrap, pour your ganache onto it and roll it up salami style.
To make your log, you will need 2 pounds of chocolate (typically recipes call for 1 pound of semisweet and one pound of white coating chocolate). Those who are more in the know tell me that the half-and-half combo makes the log a bit softer than one that is fully. People also tend to prefer the lighter color that the white chocolate creates when mixed in.
I personally think the 50/50 ratio makes it a bit sweet so I played around with the ratio. When I tried 100% semisweet, I agreed that it wasn’t soft enough, so I went with a 75/25 ratio the next time. Whatever ratio you choose for your chocolate, you will also need 10 oz. of non-dairy topping and 6-10 crushed hamantaschen (depending on how large they are). Don’t crush them too small, you want to have larger chunks mixed throughout.
- Start by melting your chocolate. Whether you do this in a double boiler on the stovetop or in your microwave is up to you. Either way works perfectly fine, it’s just a matter of preference really.
- Once your chocolate is completely melted, add in your (unwhipped) whipped topping and whisk until completely combined. Mixing it thoroughly will give it the smooth, shiny finish you want.
- Fold in half of your crushed hamantaschen to start. You don’t want it to be overloaded, or you won’t get a smooth finish on your log (because you will see chunks sticking out). But you want there to be enough that it’s marbled throughout. Use your judgment.
- Once you’re satisfied with the amount of hamantaschen, pour it all into your mold. I poked around the mold a bit to make sure the larger chunks were evenly distributed.
- Put your mold on a cookie sheet, and tap it on the counter a few times to make sure that a. the chocolate settles into all the nooks and crannies and b. you get rid of any air bubbles. Then slide the cookie sheet into the freezer for a couple of hours and wait for it to set.
- Once it’s set, carefully remove it from the mold and get to work decorating. (Be careful to avoid handling it too much as you do not want to leave fingerprints on the shiny finish of the chocolate. If you need to move it around, lift it gently from the bottom with a spatula.)
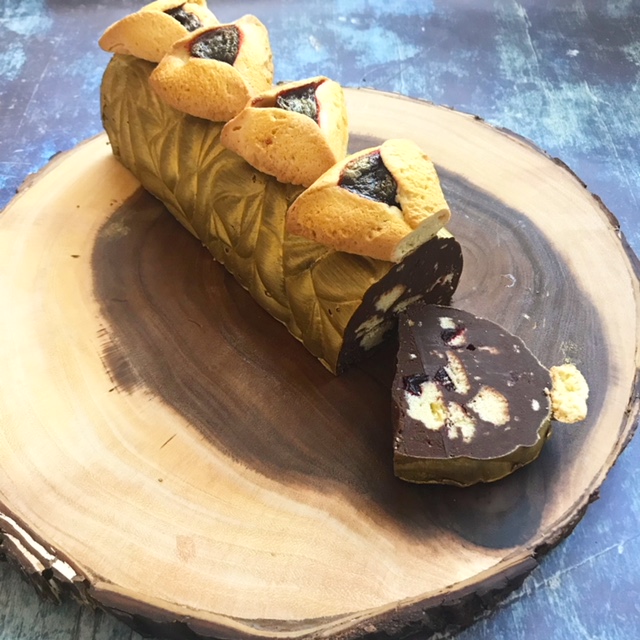
You can follow my lead and paint it gold with a row of overlapping hamantaschen at the top or take any of the other above suggestions. Or come up with creative ideas of your own. Basically, top it with whatever your heart desires!
After you’re done decorating and before you wow your guests, stage your photo shoot so you can add your amazing log to the wonderful world of social media—and don’t forget to tag me @sweettoothstl so I can see it too! Happy Purim!