Tu Bishvat is a holiday that I’m honestly more likely to forget. It’s one of those small ones that falls between the big ones, and it was never particularly exciting when I was a kid.
Growing up as a product of the day school system, it usually just meant some raisins, dates, dried apricots, and carob bark in a little plastic baggie. Oh, and that song, “Tu Bishvat hegiah, chag hailanot…” But that was it. Then it was over.
Now, as a mom, I try to modernize the “less popular” holidays for my kids. I like to involve them in ways that are fun while also giving us the opportunity to talk about what it is we’re celebrating and why.
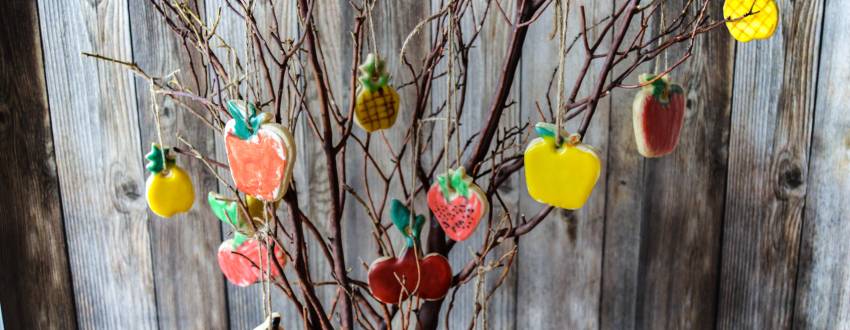
On Tu Bishvat, we’re celebrating the new year for trees, so I wanted to incorporate trees into our “lesson.” But…we live in St. Louis, and it’s 20 degrees, so we brought the “tree” inside. And, I’m a baker so, naturally, my first thought was fruit cookies as opposed to actual fruit. I don’t like to be too literal. Where would the fun be in that?!
So, I’m going to walk you through the steps of our “Tu Bishvat Cookie Tree,” so that you and your kids can create your very own this year!
I’ll start by saying that there are all different levels of involvement here, so you can pick what works best for you! Whether you’re a self-proclaimed “Pinterest mom” like me, or you just want a quick, simple project to keep your kids entertained for a few, I promise this will meet your requirements.
What you’ll need (depending on which option you choose, the supplies will vary):
- Branches- Collect some from your backyard and wash them off or go all out and buy some pretty ones at the florist.
- A vase to hold your branches
- Various fruit shaped cookie cutters
- Your favorite sugar cookie recipe
- A number 12 piping tip or a chop stick/skewer
- Fondant (for option 1)
- Edible food ink markers (for options 1 and 2)
- Unused paint brushes (for option 3) (you can get cheap ones at the dollar store in packs of 10)
- Confectioner’s glaze (for options 2 and 3), recipe below
- Food coloring (for options 2 and 3)
- Twine
- Glass beads or stones to weigh down your vase
Let’s get started!
Start by collecting and preparing your branches (or purchasing them). Then prepare and chill your cookie dough. I always like to chill my dough for at least a half hour as this prevents spreading when the cookies are baked. The colder the dough, the better the cookies will keep their shape.
Since these cookies will be hanging from our tree, it’s important to create a little hole for the twine before baking them. To do this, I used a number 12 piping tip, which is basically a teeny tiny circle cutter, but if you don’t have one you can also poke a hole at the top with the end of a chopstick or skewer. Just make sure it’s wide enough for you to thread your twine through.

I like to let my kids do the cookie cutting, but I do the hole punching, because it takes some precision. I have little ones, but if your older ones are up to the task, feel free to give them total control.
Once your cookies are baked and cooled, you have three options for decorating them:
1. You can cover them in fondant and let the kids color them with edible markers.
2. You can dip them in the confectioner’s glaze, let it set, and once again use edible markers to decorate. Or…
3. You can color your confectioner’s glaze, and let the kids go to town painting the cookies. (My kids’ favorite option, but also the messiest).
Option 1: Fondant and edible markers
This option is for those who like a cleaner look (and kitchen) and/or prefer the taste/texture of fondant to icing. For this option you’ll need some white fondant rolled out thin on some parchment paper (you don’t want it to be too thick or it tastes gummy). Use the same cookie cutters you used for your cookies and cut the shapes out of the fondant.

Brush your cookie with some water so that the fondant will stick—but just a little; you don’t want to saturate it. Carefully lift your fondant cutout and place it onto the cookie, lining it up correctly. Use the same tool you used to make the hole in the cookie to make a hole through the fondant in the same spot. Let the fondant dry for an hour or so before coloring it with the edible markers. If it’s too soft the markers will tear the fondant.
Option 2: Confectioner’s glaze and edible markers
This option is for those of you who want the icing factor, but not all the involvement of dividing the icing, coloring it, and painting etc…
Glaze recipe:
- 2 cups powdered sugar, sifted
- 1 tsp vanilla extract
- 1 and 1/2 - 2 tablespoons water
1. Sift your powdered sugar into a small bowl.
2. Add in your vanilla and 1 ½ tablespoons of water.
3. Whisk it together until smooth. If it’s way too thick, add the extra ½ tablespoon of water.
Line a cookie sheet with parchment paper. One at a time, take your cookies and dip them into the glaze. Only dip the surface, don’t dunk the whole cookie. Lift it up and allow some the excess to drip back into the bowl. Flip the cookie over and put it on your cookie sheet to dry. You can use a toothpick to pop any air bubbles you see in the icing.

Don’t worry if the hole gets covered by icing, once it’s dry you can scrape it away with a toothpick. With this method, you’ll need to let the icing set for 24 hours. Confectioner’s glaze is a lot easier than royal icing, but it does not harden as quickly. If you don’t let it set up, it will be too soft, and the markers will ruin it, so be patient!

Option 3: All out painting fest!
For those who don’t mind a little bit of mess and a little extra time involved for prep.
Using the recipe above, prepare your glaze. Divide your glaze into several different containers. If you want three colors, you’ll need three containers. If you want eight colors, you’ll need eight containers.
*Pro tip: Use an egg carton. Place a little icing in each compartment, add a drop of food coloring in each, and stir with a toothpick. It’s a makeshift paint palette that can be thrown away when you’re finished for easy clean up. It can also be closed up and saved for later without the icing drying out. (If you’re saving it, place plastic wrap over the icing before closing the carton lid for extra protection.)

Place a paintbrush in each color and let your kids have a blast painting their fruit cookies. Make some “typical” fruit colors or let their creative juices flow and ask them which colors they want to use!

Assembly:
Once your cookies are finished and dry, you’ll need to string them. Thread your twine through the hole and knot it. Try varying lengths so your cookies hang differently all over. Place your branches in the vase and add the filler to weigh it down. Let your kids add their cookies all over, then stand back and admire the fruits of your labor (wink, wink).

I’d love to see your Tu Bishvat cookie trees! If you make them, tag me on Instagram @Sweettoothstl

When leaving comments on kosher.com we ask that you be respectful, appropriate, and stay on topic. Click here to read our full comment policy.
Kosher.com Commenting Guidelines
We love hearing from our community! Constructive feedback, tips, questions, and friendly engagement are encouraged.
By commenting on Kosher.com, you agree to follow these guidelines. Please note that comments are for community discussion only and should not be considered halachic guidance—always check with your own Rabbi or LOR.
1. Be Respectful
2. Keep It Appropriate
3. Protect Privacy
4. Stay On Topic
5. Moderation