The following article contains affiliate links. We may make a small commission from any purchases made from the links on this page.
Hitting the road and traveling kosher has its challenges, especially with a family in tow to feed. Shlepping huge amounts of food and utensils, accessing your supplies, dealing with a limited physical set-up…it’s often a test of ingenuity even for the best balebustas among us.
My family eats well when we travel. It’s not because I’m a cook, and it’s not because I’m a foodie (although it doesn’t hurt, either). We eat well when we travel because, in addition to planning ahead with food needs, I bring along portable gadgets that make preparing simple, fresh food a cinch, whether in a hotel room or a home rental. Seeing how much more our family enjoys a vacation when there is good food to eat makes me dedicated to making the effort. But let’s be clear: I want to get it done without feeling like I’ve sacrificed my own vacation. A few small and simple modern inventions can help keep travel cooking “no-fuss” with delicious efficiency and surprising versatility.
As my readers and students know by now, I favor multi-purpose tools; so I bring along gadgets that have several uses which can serve my family well on the road. It has shocked many that I rarely go on vacation without my rice cooker, panini press or portable grill. Beyond that, a flexi-cutting board mat (they take up no space) and a sharp knife are my kitchen-in-tow. They may not seem like your go-to travel appliances, but they’re mine. Here’s why!
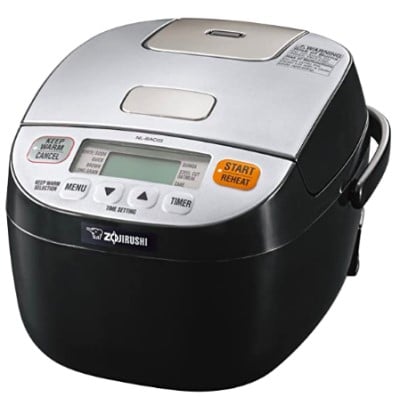
Top 5 Reasons I Love My Rice Cooker:
1. Set it and forget it for perfect rice every time: With no effort exerted to watch over a flame or concerns of burnt rice, all there is to do is dump, fill, and press a button. Especially great in absence of a kitchen!
2. The “Warm” setting: Most rice cookers have a feature that automatically keeps the rice on a low warm setting once cooking has concluded. It will keep the rice ready for hours until used. Imagine – go out for the day, and rice is ready whenever you come home!
3. Not just for white rice! A good rice cooker will have the capability to cook more than just white rice – can be used for brown rice, quinoa, etc.
4. It’s portable: While a rice cooker may seem large to travel with (it can be equivalent to a crockpot in size), many are more compact in construction, with no loose breakable glass lids or ceramic bowls. Mine even has a retractable cord and carrying handle.
5. Breakfast, too? You bet! I use my rice cooker’s porridge setting to make oatmeal in the mornings for a healthy, hot breakfast…bring along steel-cut oats and toppings (brown sugar, dried cranberries, etc.) and there’s a breakfast to satisfy and fill hungry tummies.
Rice bowls are hugely popular nowadays – an artfully decorated all-in-one lazy man’s meal. A deep bowl filled with rice (any kind), and topped with your choice of raw and/or cooked ingredients – leftover grilled chicken, canned black beans, chopped tomatoes…
It looks so elaborate – how could I possibly do that on vacation? you may ask. A little bit of advanced planning goes a long way, and any raw veggies can be chopped while your rice cooker works its magic!
Purchase a Zojirushi rice cooker on Amazon
What You Can Make In Your Rice Cooker:
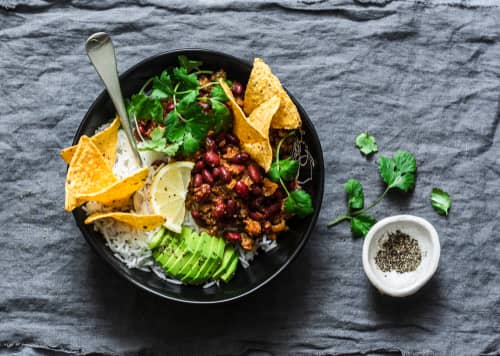
Serves 6 to 8
Pre-measure and bring along your spice mix in a small container or zip-top baggie to minimize packing extra supplies – it will also save time later! Most rice cookers come with a measuring “cup” or scoop that can hold 3/4 cup (180 mL). The cup fill line inside the rice cooker corresponds to this measure. This recipe is based on rice cooker measurements, but conventional dry measurements have been provided as well.
Ingredients:
3 cups long grain rice (conventional dry measure: 2 and 1/4 cups)
3 cups water
2 teaspoons oil
Yellow Spice Mix (see below)
2 to 3 plum tomatoes, chopped
1 to 2 avocados, peeled, pitted and diced
1 (15-ounce) can black beans, drained and rinsed
1 (15-ounce) can corn, drained
1 (8-ounce) bag shredded cheddar cheese
1 (8-ounce) container sour cream
Taco sauce
Corn taco shells or tortilla chips
Yellow Spice Mix
2 teaspoons kosher salt
2 teaspoons dried cilantro flakes
1 and 1/2 teaspoons dried minced onion
1 and 1/2 teaspoons turmeric
1 teaspoon garlic powder
1/2 teaspoon ground black pepper
Instructions:
Place rice in bowl of rice cooker. Fill with water to 3-cup fill line in rice cooker (three cups water). Add oil and yellow spice mix – stir to mix in spices. Close rice cooker lid and press start on setting for white rice. When rice is done, fluff with rice paddle or fork.
Fill deep bowls with rice. Then top with a large spoonful of each topping: tomatoes, avocado, black beans, corn, and cheese. Add a dollop of sour cream and drizzle with taco sauce if desired. Serve with broken taco shells or tortilla chips.
The Panini Press: Perfect for Paninis…and cooking everything else!
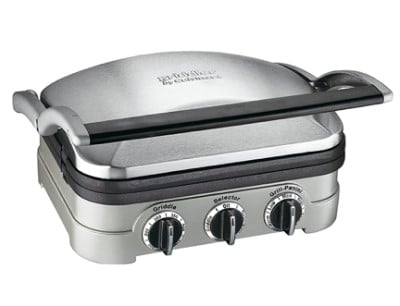
The panini press is essentially a powerful sandwich grill. The top closes down with pressure against the food on the bottom to create the perfect melty, toasty, compact sandwiches. That alone makes the press a perfect travel companion.
But just think about how many other foods the panini press can quickly cook! Pancakes, quesadillas, omelets, veggies- almost anything! Good, hot, fresh food will always be only a few minutes away when traveling…and that is quite a lifesaver! Some panini presses also have removable plates that you can swap out for griddle plates.
Push past the limits of what you think a panini press can do for you on the road, and you’ll be amazed at what vacation fare can become. Here are some unusual ideas to get you started!
Purchase a Cuisinart panini press on Amazon
What You Can Make In Your Panini Press:
Serves 4
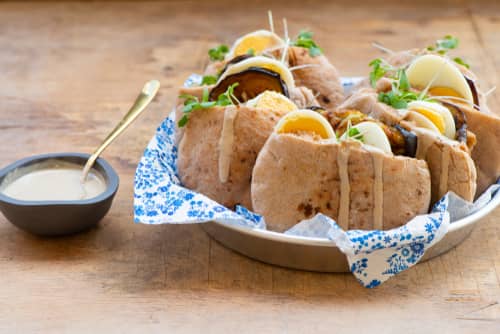
A sabich is a popular Israeli sandwich consisting of pita stuffed with fried eggplant and hard boiled eggs. In this version, the eggplant is grilled and the eggs are fried on the panini press.
Ingredients:
1 small eggplant, sliced into 1/3-inch rounds
4 eggs
Nonstick cooking spray
4 pitas
2 Persian cucumbers, scrubbed and diced
2 small tomatoes, diced
1 lemon
1 (7-oz.) container hummus
1 can Israeli pickles, drained and sliced
Tahini or amba sauce (optional)
Instructions:
Preheat panini press on high setting. Spray with nonstick cooking spray. Place eggplant slices on press (you may have to do this in batches, depending on size of machine). Close top and grill for about two to three minutes or until eggplant is tender and has grill marks. Transfer slices off press; repeat as needed.
Reapply cooking spray to the panini press. Crack one egg into a glass, being careful not to break the yolk. Carefully pour egg onto center of hot press (if cooked too close to the edge of the press, the whites will run off before setting). Allow egg to set and cook until yolk is halfway cooked but still a bit runny, about three to four minutes. Repeat with remaining eggs (a large press can accommodate more than one egg at a time).
While eggs cook, combine tomatoes and cucumbers. Season with salt and pepper and a squeeze of fresh lemon juice.
To assemble, make a slit in the top of the pita, hollowing out a pocket inside the opening. Slather a spoonful of hummus inside pita, then stuff with two to three slices of eggplant. Add a few slices of pickles, a big spoonful of tomatoes and cucumbers, and then carefully slide a fried egg into pita. Drizzle with tahini or amba sauce if desired. Enjoy…but have napkins on hand!
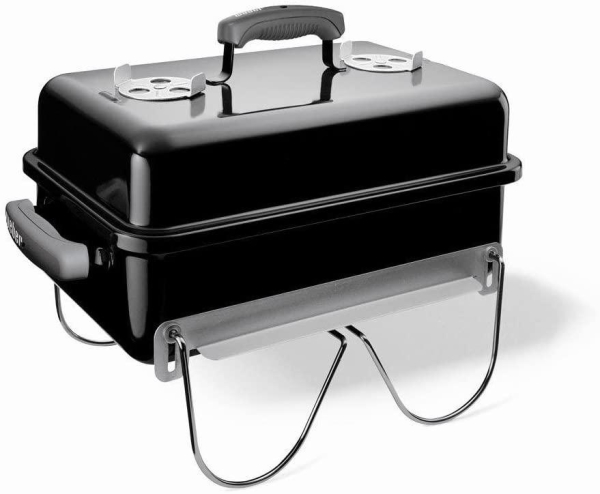
The Portable Grill
Summer is the season for outdoor cookery, and nothing is better on vacation than a dinner right off the grill. Burgers, fish, chicken – anything you usually cook on a grill will work.
A small portable grill is a great, inexpensive investment for happy car travels. These grills are available in a compact size with covers that lock closed – both for charcoal use or with propane fuel canister. Be sure to bring along tongs and a lighter/matches, too!
Purchase a Weber portable grill on Amazon
What You Can Make On Your Portable Grill:

Kebabs To-Go
Put wooden skewers on your packing list because everyone likes kebabs – how can you go wrong with a meal on a stick? In their simplest form, the only prep they really require is assembly. While your skewers are soaking in water (to prevent burning), cut up your kebab “components.” I like to make it a family effort and get the kids involved – with the extra hands helping, threading the skewers goes pretty quickly, especially in assembly-line fashion!
For best results, pair your skewers creatively and with components that complement each other. This applies to marinade sauces as well. Although I would ordinarily make my own marinade at home, using the convenience of a prepared marinade or sauce on the road is not only helpful to boost flavor and glaze kabobs, it is also more portable for transport. Cubed meats, poultry or fish can be marinated earlier in the day if time and refrigeration space allows (bring large ziptip bags for this!), or can just be applied at the end of cooking time as a glaze.
What do YOU like in your kebabs? Plan ahead and make sure you’ve got all your supplies for seamless preparations while away. The following are some fun pairings to start you off on your kebab fun! Be sure to use ingredients that are cut to roughly equal sizes –this will ensure even cooking on the grill.
- Cubed chicken, cherry tomatoes, zucchini, pearl onion with pesto sauce
- Cubed beef, pineapple chunks (can be canned), red pepper, onions with Asian barbecue or hoisin sauce
- Cubed chicken or turkey, fresh apricots (halved and pitted), red onion with sweet chili sauce
- Browse our recipe collection for more kabob inspiration
Instructions:
1. Soak wooden skewers in water for at least 10 to 15 minutes. (Meanwhile, prep your ingredients!)
2. Carefully thread alternating ingredients onto skewers. Make sure raw cubed poultry or meat is securely threaded.
3. Heat up your grill. Spray it with nonstick cooking spray.
4. Place threaded skewers on the grill; close top and grill for about four to five minutes per side, turning once during cooking.
5. Brush sauce of choice over skewers and cook for one more minute to glaze.
6. Repeat with remaining skewers.
*Don’t forget your kebab supplies: skewers, nonstick spray, ziptop bags, and prepared sauces.
There you have it! My top 3 favorite cooking gadgets to bring on the road. With my tips and recipes there’s no reason not to eat well wherever you decide to travel to this summer!
Other articles you might enjoy on food preparation while traveling:
Kosher Foods You Can Find at Any Store While on Vaca + How to Cook Them