
Freezers are a cook’s best friend.
Or your food’s worst enemy.
When done correctly, freezing cooked food preserves its freshness and keeps you ahead of the yom tov rush.
And if not? Well, picture that ice-crusted package of indeterminate food with an “off” color and smell. You know, the one you find before Pesach in the back of your freezer.
There’s a science behind freezing your food correctly. With Rosh Hashana on the horizon, this is the perfect time to dive into Freezer Skills 101.
KNOW THINE ENEMY
There are two concerns to keep in mind when freezing food: food safety and preventing freezer burn.
They come from different sources.
1. Air – Air is usually the good guy, full of the oxygen we need to breathe. But when that oxygen gets to your frozen goods, it kicks off a damaging chemical process.
First, it oxidizes the food, changing the color and taste. Plus, moisture leaks out of the food, only to freeze on the surface as ice crystals. The ice further dehydrates, or “burns,” the food.
The food is still safe to eat, but you wouldn’t want to.
See below for suggestions on how to wrap your food to avoid freezer burn.
2. Bacteria – According to the USDA, the Food Danger Zone is between 40 and 140 degrees Fahrenheit, when bacteria can multiply the quickest.
Our freezer temperatures are set below 40 degrees Fahrenheit, so bacteria can’t grow there. But food that is thawing or not-yet-frozen can be a breeding ground for microbes.
We’ll talk about safety measures that will protect your food before and after freezing.

STARTING ON THE RIGHT FOOT
How you freeze your food makes a huge difference in its quality when you defrost it. The fresher the food going in, the fresher it will be when you eat it.
On the other hand, always cool an item completely before putting it in the freezer. Why?
Hot food can raise the freezer’s overall temperature or defrost the outer layer of the food next to it. Food that defrosts and refreezes is more susceptible to freezer burn from moisture that leaks out and refrozen on the food’s surface.
Food cooked in large pots takes a long time to cool. Dividing it into small containers will help it cool more quickly and freeze more evenly and safely. (It’ll also prevent waste when you defrost.)
PLASTIC, GLASS, AND FOIL
As we mentioned above, you want your food to be as airtight as possible. Plastic containers and freezer bags create the best seal.
To get the best results from plastic containers, “burp” them, a là Tupperware:
1. Close the lid tightly
2. Lift one corner slightly and reseal.
3. You should see the cover tighten with a vacuum-like seal.
Make sure to leave an inch of headroom in the container to allow the food to expand. And don’t use glass containers unless they explicitly say they’re freezer safe.
Unfortunately, there’s no burping your plastic bags, but you can:
1. Close the bag almost completely, leaving a tiny space in the corner.
2. Insert a straw into the bag and suck in. (Do not blow INTO the bag!) You’ll see the plastic retract.
3. In a quick motion, pull out the straw and seal the bag.
And, yes, there IS a difference between “freezer bags” and “storage bags.” Freezer bags are thicker and will hold up better in the cold without getting brittle and ripping.
Tinfoil or saran wrap aren’t airtight, but are more practical for covering large pans. To keep out the air, either double wrap the food or wrap it once and put it into a plastic bag.
TIP: Lay individual items like kneidlach or latkas in a single layer on a foil tray and cover tightly. Transfer them to a plastic bag once they’re frozen (two to three hours.) They’ll remain individually frozen so you can defrost as many as you need at a time.
FOOD BY FOOD GUIDE
In general, food should be thawed in the fridge to keep it out of the Danger Zone. But it may take overnight or longer, and foods like kugels or casseroles can get soggy that way.
Food by food, here are tips and workarounds to get the safest and best tasting results possible.
● Baked Goods –
To freeze – Freeze Cookies or bars in containers or freezer bags. Whole cakes can be double wrapped in foil or foil and a bag.
To thaw – Baked goods are easy. They can be thawed at room temp from both safety and taste standpoints.
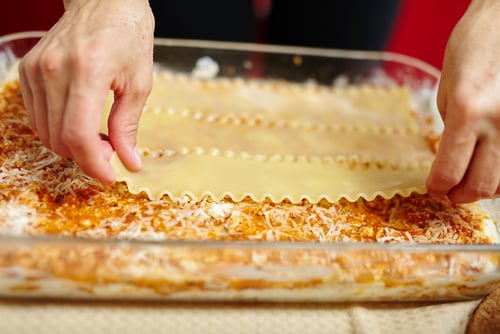
● Kugels, Casseroles, Lasagna –
To freeze – Wrap the pan tightly in foil. (Get extra credit for double wrapping!)
To thaw – Put the pan directly into a cold oven, turn on, and heat until defrosted.
TIP: Some dishes, like lasagna, can be frozen raw or par-baked. Cook them straight from the freezer.
To freeze – Divide soups or stews into small containers and cool in the fridge before freezing.
If the soup or stew has:
– pasta, it will turn to mush when frozen. Leave out the pasta when you prepare the soup and add it in when you defrost.
– cream or milk, it will separate and turn grainy. Like the pasta, add it in when you defrost.
– any veggies, they will get softer, so you may want to undercook the soup before you freeze it.
To thaw – Defrost the container overnight in the fridge or put the frozen food into a pot and gently heat.
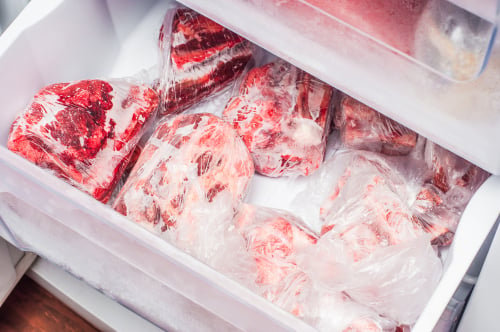
● Cooked Meats and Chicken–
To freeze – Slice any meats. Wrap the pan tightly in foil. (Extra credit again for double wrapping!)
To thaw – Defrost the pan in the refrigerator. Give yourself time; roasts may take two days to defrost.
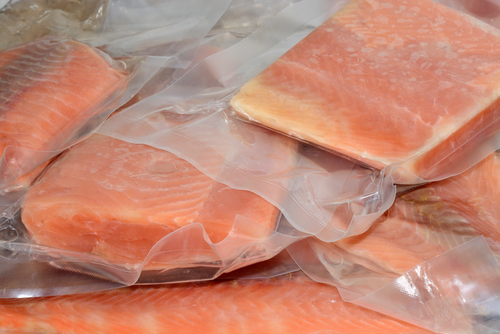
● Cooked Fish –
To freeze – Double wrap the fish or pan in foil.
To thaw – Defrost completely in the fridge. Gently reheat in the oven.
TIME FLIES. . .
Even the most tightly wrapped food can’t keep out air forever.
Safety-wise, frozen food lasts indefinitely. But taste-wise, the quality deteriorates.
Foodsafety.gov recommends these maximum freezing times for food:
● Soups and stews: 2-3 months
● Kugels and casseroles: 2-3 months
● Cooked poultry or meat: 5-6 months
● Cooked fish: 2-3 months
● Baked goods: 2-3 months
These are estimates, of course. Every freezer is different, and even placement within the freezer can impact the food.
Follow the LIFO rule-last in, first out-to keep food from getting too old in your freezer. It’s also a good idea to label and date all pans, bags, and containers.
REFREEZING PROTEIN
Your mother probably taught you never to refreeze chicken or meat that defrosted. That was conventional wisdom for years.
But according to the latest from the USDA, you CAN refreeze protein, but ONLY IF it was kept out of the Danger Zone.
You CAN refreeze any raw or cooked foods that were thawed in the refrigerator.
DO NOT refreeze any foods left outside the refrigerator longer than two hours or only one hour in temperatures above 90 degrees Fahrenheit. That includes groceries you brought home from the store.
GET READY FOR YOM TOV
Why not make your life easier? Look at your Shabbat menu and see if you can double a dish and freeze half for yom tov.
Or maybe there’s a favorite food that you always prepare for Sukkot. Your family loves it, but it’s labor-intensive. Take a few hours to cook it now without pressure. You’ll thank yourself later.
Ready, set, freeze!


